Tennis Drills can be both a challenging and fun way to improve your skills. While drills are necessary to get better as a player, they don’t necessarily need to be excruciating or boring to perform.
Of course, the harder you work on them, and the more often you practice the drills, the more you will get out of it. Through regular repetition, drills allow you to automate your strokes during match situations.
Automation is the key to performing at a high level. The more you practice specific shots and techniques, the easier it will be for you to perform those same strokes during match time, without having to think about them.
Below is a list of 20 drills that you can practice with a partner or tennis ball machine to improve your skills. These drills will not only challenge you and help you improve, but they are also great fun to perform.
1. Touch the Ground
This is a great cardio exercise that will help improve your side to side movement and strengthen your quads, hamstrings, and glute muscles all at once. You’ll need a partner for this drill.
To perform this drill, stand along the baseline and have a hitting partner feed you balls from side to side. One to your forehand, one to your backhand, and then keep repeating the sequence.
When feeding you balls, it’s best if your hitting partner is positioned behind the net, within the service box. This drill can also be performed using a ball machine if you don’t have a hitting partner.
After you hit your shot, you need to bend down and touch the ground with your hand. Try to bend your knees as you touch the court rather than simply bending over with your back.
2. Service Box Warm Up
This is a great drill for warming up before a match or during practice. The concept is simple, play within the service boxes so that the service line becomes the baseline.
When you practice within a confined area, it allows you to more closely focus on making contact and getting a feel for the ball. Since you don’t have to worry about power, you can concentrate more on your timing and technique.
Try to practice both your forehand and backhand at the very least. You can also practice your volleys and even serves or overheads as long as you take pace off the ball.
This drill is also great for beginners to get comfortable with the game. Once you are warmed up and ready to step back and play full court, start out slowly, increasing your pace as you go along.
3. Three-Quarter Court Warm Up
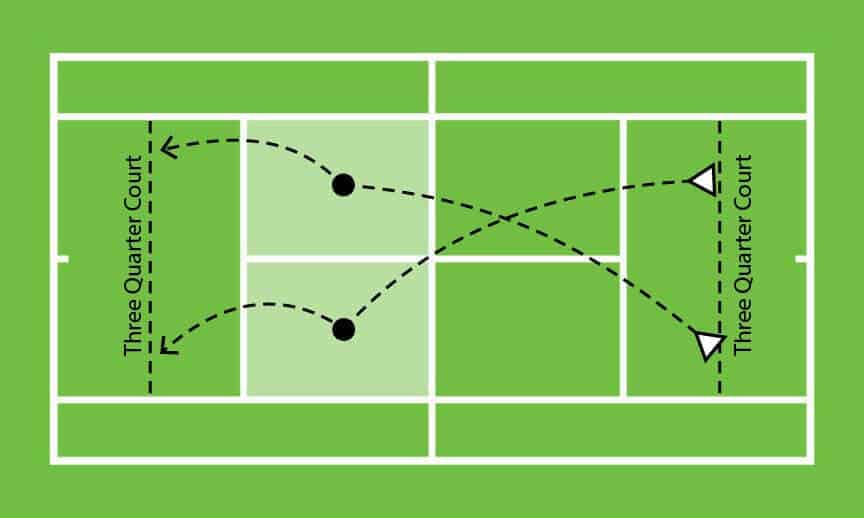
This is another great warm-up drill where the objective is to get comfortable with hitting cross-court. Players start positioned halfway between the service line and baseline.
Both players hit the ball to one another cross-court, making sure it lands within the service boxes. During the drill, you can practice both your forehand and backhand groundstrokes and topspin technique.
If you want to mix things up a bit further, you can alternate with hitting down the line as well. Just make sure to keep the ball within the service boxes and remain positioned roughly between the service line and baseline.
Once you are hitting your shots with consistency, you can step back closer to the baseline and continue with the drill. Just as you did when positioned closer, continue to land your shots within the service box area.
4. Depth Battle
Depth battle is, in a sense, the opposite of the previous drill. The objective of this drill is to place the ball somewhere beyond the service line but within the baseline.
This is a great drill to develop your shot depth skills. Playing shots deep to your opponent’s side is key to winning matches, and this drill can help you improve your deep balls.
In order to make it more interesting, you can keep score. The first one to 21 points, for example, wins. A point is achieved when your opponent misses their shot or lands the ball within the service box.
A missed shot includes a shot hit into the net, wide of the singles sidelines, or long beyond the baseline. Practice this drill regularly to develop consistency in your deep shots.
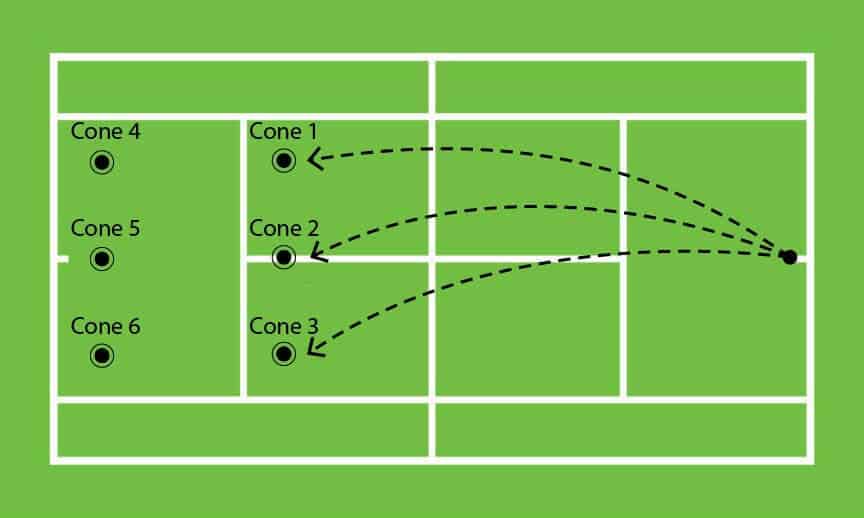
5. Corner Zones
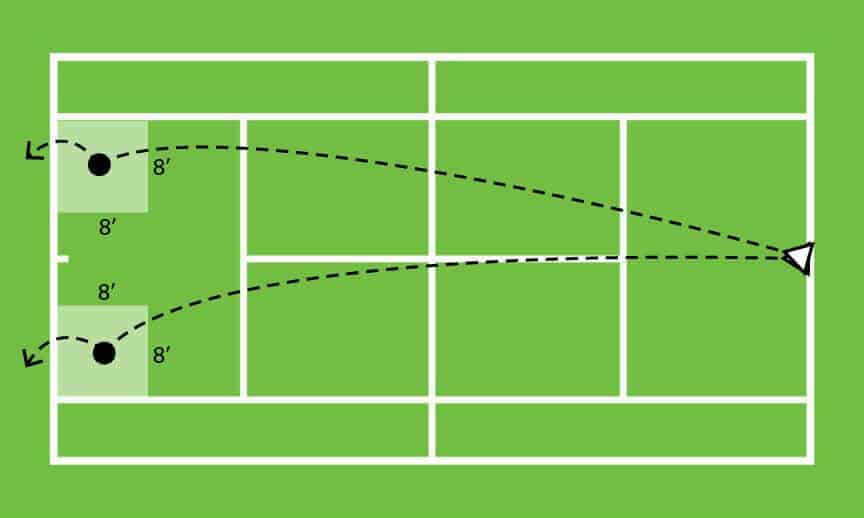
To perform this drill, place a few cones at each corner of the court, where the baseline and singles sideline meet. Space the cones about 8 feet from the singles sideline and 8 feet from the baseline, forming a square.
Players must hit the ball within the box formed by the cones and the baseline and singles sideline. The objective is to discourage players from hitting their shots short or in the middle of the court.
If you find that the 8-foot spacing is too difficult to land your shots, you can increase the distance and gradually decrease it again as it becomes easier to perform with practice.
This drill can be performed with a coach or partner feeding you balls, a ball machine, or if necessary in situations where you are practicing alone, by self-feeding balls.
The drill encourages you to place the ball towards the corners of the court, a strategy you want to regularly employ during your matches to keep your opponent backed up and on the defensive.
6. Tramlines
The concept of this drill is simple: hit the ball across the net and keep the ball within the doubles alley. While simple in concept, execution is difficult and takes some practice.
Don’t be discouraged if you struggle with the drill initially. It takes a good amount of practice to get good at it. However, the benefits of the drill are worth the initial frustration you may experience.
This drill greatly improves your placement accuracy. It teaches you to hit the ball straight in the direction you intended. While most useful for down the line shots, it can improve your overall groundstroke placement.
7. Inside the Baseline, Cross-Court
This drill is played positioned inside the baseline. Both players on opposite ends must hold this position while hitting the ball cross-court, they are not allowed to touch or step behind the baseline.
Scoring can be used to make the drill more engaging. For example, first to 11 or 21 points. If a player steps on the baseline or steps beyond the baseline, they lose a point.
The objective of this drill is to teach players to hit the ball on the rise and learn to react more quickly to the oncoming ball. This is an important skill to have during match play as it will allow you to move your opponent.
8. Knock the Cones
This is another drill that will help improve your aim and ball placement. Players on both sides set up cones strategically throughout the court, and they try to knock over their opponent’s cones.
While the location of the cones can vary, try to set them up in strategic locations where you would want to aim your shots. For example, you can locate them 4 feet from the corner between the sideline and baseline.
It’s also important that the cones be placed in the exact same locations on both sides of the court so that both players have an equal chance of knocking them over.
The first player to knock over all the cones wins. The cones can be knocked over by a direct hit or as the ball rises, however, if they are knocked over on the drop it doesn’t count.
9. Approach, Lob, Overhead
This drill allows you to practice both your approach shots and overheads. Your partner starts the sequence by feed you a short ball, you then need to hit an approach shot.
Try to position your approach shot deep into your opponent’s side and preferably towards the corner. Approach the net as soon as you hit the approach shot.
Your opponent then lobs you on the next shot while you are up at the net. Back up by sidestepping and set up for the overhead by holding your racket high to the side of your body.
Swing through fully and focus on positioning your shots mostly cross-court. After practicing the drill for a while, you can switch with your partner so they can practice their overheads and you can practice your lob shots.
10. One Serve Match
This is a great drill to get you to focus on making your first serve with consistency. Play a set as you normally would, but you are only allowed one serve on each point.
Your focus should be on executing the serve with good form, placement, and adequate pace. You only get one serve, so it forces you to get the “first” serve in.
Make sure that you serve with the same amount of power that you would normally. Don’t ease up on the serve or hit a “second” serve, you want to simulate a first serve situation as much as possible.
What this drill teaches you not to do, is hit the first serve with reckless abandon. By practicing this drill regularly, you should improve your first serve percentages during matches.
11. Battle Deep Cross-Court
This exercise is a variation on the Depth Battle drill. The difference is that players need to play the ball cross-court in addition to hitting shots deep.
This is another drill where you can keep score. First to 21 or first to 11 wins, for example. If shots end up short of the service line (land within the service box) you lose the point.
If you are playing cross-court on the Deuce side and the ball lands on the Ad Court side, you also lose a point. This forces you to have to hit both cross-court and deep.
You should practice cross-court on both the Ad Court side and the Deuce Court side. That way you get to practice both your forehand and backhand cross-court shots.
The cross-court shot is a high percentage shot that will increase your chances of winning points in competitive situations. This drill will help you develop your deep cross-court placement skills.
12. Pick A Corridor
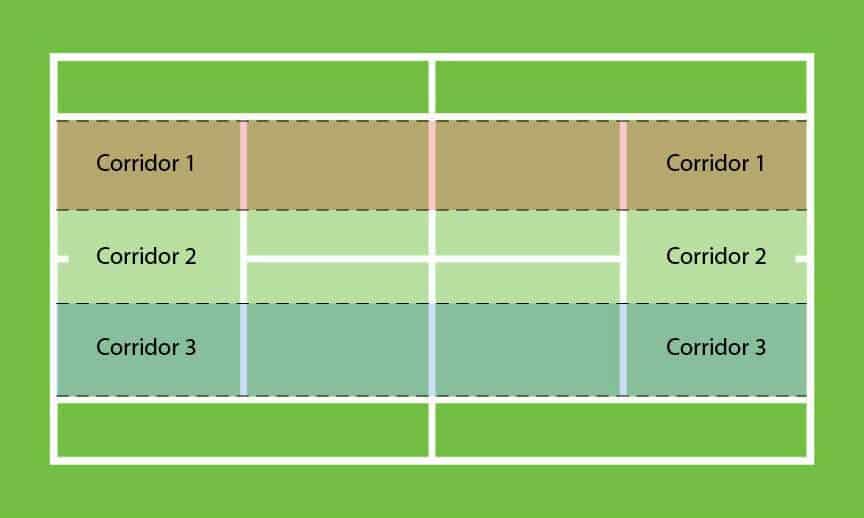
Set up a row of cones dividing the court into three corridors between the singles sidelines. Do the same on both sides of the court so that each player will play and land their shots within a given corridor.
With both players positioned in the center corridor, begin the point hitting down the middle corridor. After hitting a shot, a player can shift to an adjacent corridor if they chose to do so.
The player who is hitting the ball back needs to place it in the corridor where their opponent is standing. Players must move immediately after hitting their shot or otherwise remain in the same corridor.
This is a drill that can be played keeping score, first to 21 for example. When players miss or fail to land their shots in the correct corridor, their opponent wins the point.
13. Hold The Half Court
In this drill one player plays full-court while the other plays just within a half-court, either the Deuce court side or the Ad court side.
The player within the full court must hit their shots into the half-court side that their opponent is standing in. The player covering the full court must win a point in order to move into the half-court.
If they miss or fail to land the ball on their opponent’s side, they must remain in the full court. The player in the full court is at a disadvantage because of the amount of court they need to cover.
For this reason, players need to try to win points quickly to move to the half-court, otherwise, they will quickly become fatigued. This drill teaches you to use depth, spin, and pace to win points within a narrow corridor to work with.
14. Singles vs Doubles
This is a simple, yet very effective training drill. Two players on one side of the court play a regular set within the doubles court and one player on the opposite end plays within the singles court.
The player on the singles side gets to serve every game. Once a game ends, the player on the singles side switches over to the doubles side. This sequence continues throughout the set to allow all players to serve.
In order for this drill to be effective, the players on the doubles side should strive to really work the singles player, moving them from side to side and front and back to tire them out. As a singles player, you want to win your games quickly.
The great thing about this drill is that it allows players to practice both their singles and doubles game all at once. The intensity level on the singles side is also greater than it would normally be, providing that player with an intense workout.
15. Volley to Volley
This drill is performed between two players positioned within the service boxes at opposite ends, about 5 feet from the net. Both players volley back and forth, on both the forehand and backhand sides.
While the aim is to hit the ball back and forth without it bouncing, if it does bounce, players should try to continue the rally. This is a way to practice your half-volleys in addition to your regular volleys.
This drill can be performed during practice to improve your volley skills or it can be used as a warmup before a match. Try to keep the volley to volley rally going as long as you can. You can even count to make it more fun and challenging.
16. Lateral Weave
This drill is meant to improve your footwork. Line up a few cones (6-10 cones) in a straight line about 5 feet apart each. Start on one end of the cones and move laterally, weaving in and out of the cones.
As you move, try to remain on the balls of your feet with your feet at least shoulder-width apart. Don’t bring your feet together at any point during the drill. Try to maintain the spacing of your feet as you weave in and out.
When you reach the end of the cones. Reverse the motion and weave back, in and out of the cones, in the opposite direction. Repeat a few times, reversing each time you reach the end of the cones.
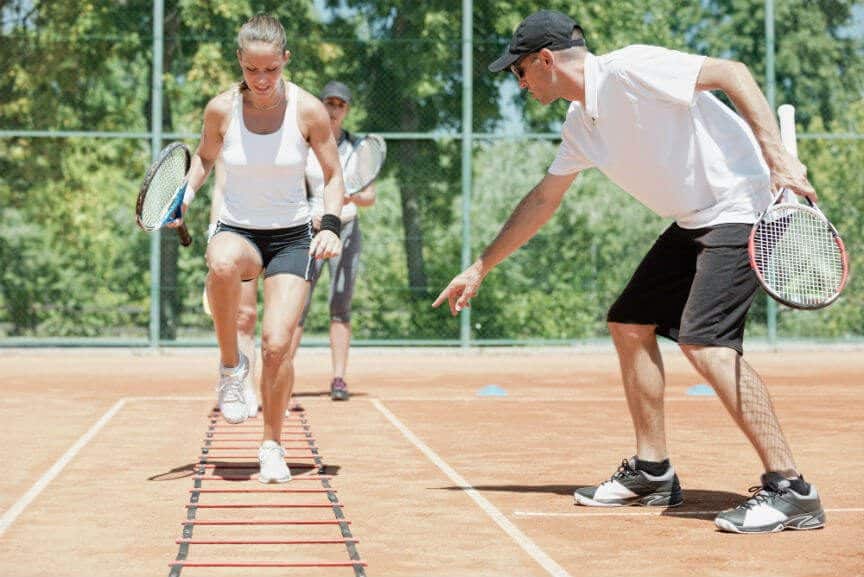
17. Lateral Agility Ladders
Place an agility ladder along the court surface and start by standing in the center with at least one rung space between your feet. You should be standing on the balls of your feet (heels off the ground) as you perform the drill.
Move from one side to the other while maintaining the space in between at all times. This drill teaches you to move laterally with your feet apart, about shoulder-width or so. This is an effective way to cover the court during play.
When you reach the end of the ladder, move back to the other end, or stop in the center and reverse direction. Just be sure to keep your feet moving at all times and remain on the balls of your feet, not your heals.
18. Ball Catch With Resistance Band
Place a resistance band around your legs while moving from side to side and trying to catch tennis balls that your partner feeds you by hand. Your partner should stand a few feet away so that the ball bounces once off the ground.
As you move from side to side with the resistance band, aim to catch each ball by hand that is tossed towards you. Ideally, you should be moving back and forth and catching the ball with your left and right hands.
The band helps provide resistance while at the same time forcing you to move laterally without bringing your feet together. Make sure the resistance band is taut at all times as you move from side to side.
Try to remain on the balls of your feet as you move from side to side. If your heels touch every now and then, that’s OK, just try to focus on balancing your weight on the front of your feet rather than on your heals.
19. Ball Catch, Round the Cone
For this drill, you will need a couple of cones or saucers and a partner. Set up two cones or saucers space about 10 feet or so from one another. Position yourself in between the cones to start the drill.
Similar to the previous drill, this drill is performed with a partner standing a few feet away and feeding you balls by hand. Your partner should alternate the direction of the ball and allow it to bounce once off the ground.
You will need to remain on the balls of your feet and shift in the direction that your partner tosses the ball. If the ball is tossed to your right side, catch the ball with your right hand. Alternatively, if to the left, use your left hand to catch the ball.
After you catch the ball, toss it back to your partner and run around the cone or saucer and back to the center again. This drill helps with hand-eye coordination as well as improving your footwork.
20. Jump, Split, Round the Cone
For this drill, you’ll need an aerobic platform and a couple of cones or saucers. Lay down two saucers on the court, spaced about 10 feet or so from one another. Place the aerobic platform in between the cones or saucers.
To begin the drill, stand on the aerobic platform. Jump off the platform onto the court in front and push off towards either the left or right. Ideally, you want to alternate between the two directions each time you jump off.
After pushing off to the side, side-step towards the cone on the end and run around it and back to the platform. Be sure to move on the balls of your feet as you side-step and run around the cones.
Additionally, make sure you maintain the spacing between your feet, at least should width apart, as you move. This drill will help improve your split step technique and your ability to shift quickly to the side.
Final Notes
These 20 drills can be used on a regular basis during practice, but many of them are also great warm-up exercises before a match. The drills should provide a good range of options for improving your strokes and your footwork.
Practice them regularly so that they become automatic. The goal is to be able to use the skills you improve on during your matches without having to think about them. This will greatly improve your game and mindset as you play matches.
Some of the drills will be difficult to execute at first. This is normal and you should not become discouraged. Just keep practicing them for a period of time and the drills will eventually become second nature to you.
Share this Post