The serve is one of the more difficult shots for beginners, mostly because it’s an overhead stroke where ball placement is confined to a relatively smaller area – the service box – rather than the full court.
However, it doesn’t need to be a stumbling block. By learning the proper mechanics involved early on, the process of developing the serve becomes easier and the stroke becomes a natural part of the game.
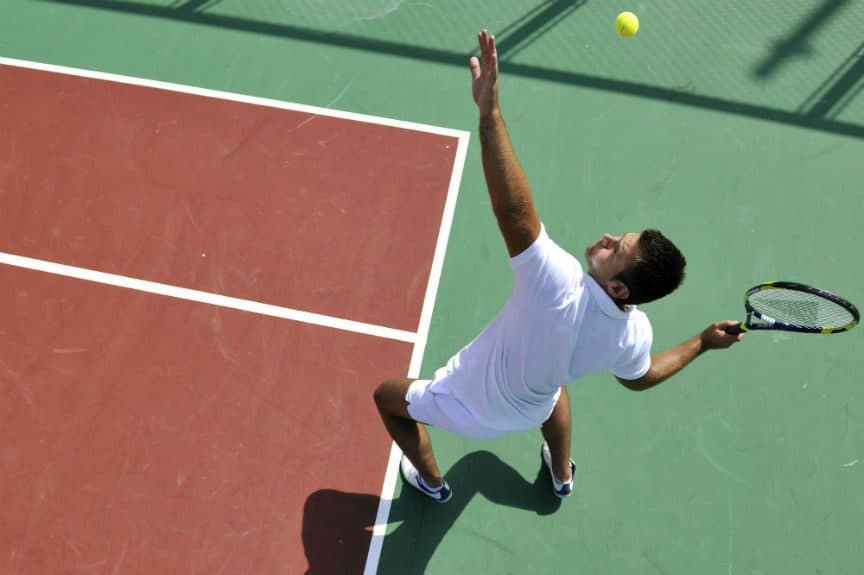
A proper serve technique involves the full extension of the non-service arm when tossing the ball in the air, fully bending your knees while shifting your racket and body weight back, then thrusting your body upward and forward as the ball reaches its peak to strike the ball with force. After ball contact, a good follow-through, landing, and recovery are also essential.
One of the best ways to improve your technique is to simplify the motion. Relax the arm and upper body during the process. You want to involve only the necessary parts of your body and do so in a flowing and unified manner.
The main parts of the body involved are the tossing arm, the service arm gripping the racket, your feet, legs, and knees for power and lift. The shoulders, hips, and torso also play a role in rotation and leverage.
1. Use a Throwing Motion
For beginners, one of the best ways to think of the service arm motion is to imagine an overhead throw. You can practice by using a tennis ball or baseball and throwing it forward using an overhead (not sidearm) motion.
The motion involved when throwing a ball is very similar to the swing of the racket. You want to make sure you are engaging your shoulder and following through fully during the range of motion.
When throwing a ball, you wouldn’t simply push the ball forward. Yet this is precisely what many beginning players do on the serve, they push the racket forward. Make sure you really engage your arm fully to get the most power.
You can take this drill one step further and actually use a beat-up tennis racket to throw. Just make sure it’s an old racket that you don’t mind trashing and that no one else is nearby. Using a racket will actually give you the best sense of what the stroke should feel like.
2. Practice the Service Toss
In addition to the racket swing, you want to get comfortable with the toss. You can practice tossing the ball up and having it land directly below. The placement should be just in front of you and slightly off to the side.
Hold the tennis ball with your fingers, rather than your palm. This will prevent you from cupping the ball and throwing it up erratically. Imagine yourself guiding the ball up rather than tossing it.
If you find you are tossing the ball up erratically, you can experiment with the way you hold the ball. One option is to position your hand sideways. Another option is to toss the ball with your hand facing down. This will prevent you from putting excessive force on the ball.
You want to make sure you extend your arm fully during the toss. You should release the ball at about the point where it reaches the top of your head. Keep your eyes on the ball as you guide it up.
As you practice the toss, also bend your knees and work on shifting your weight from your front foot to your back foot. This will prepare you for the swing motion where you push off your feet to strike the ball.
You should practice the toss until it becomes consistent. Make sure it always goes the same height lands in the same spot. You can place a racket on the ground and aim the toss so it lands on the head of the racket.
Another training technique is to place a ball on a fence at an ideal height and location. Practice tossing the ball up so it aligns at its peak. To determine the ideal location, have a partner watch you serve, and identify where you hit your strongest serves.
3. Shadow the Motion with a Racket
In addition to practicing the toss and the throwing motion, another good exercise to develop the serve is by shadowing the motion with a racket. Try to incorporate the motion of the toss, though you will not actually be holding a ball in hand.
As you extend the tossing arm up, bend your knees. Shift your weight to your back foot. Take a swing in the air with the racket in hand as if you were striking a ball. You want to push off your back foot and shift your weight forward as you do this.
As you shift forward your back foot will step forward and your weight will transfer from your back foot to your front foot. Step through fully and follow through with the racket swing. This is not only a good practice drill but also a great way to warm up before serving.
This exercise is ideal on days where you can’t get out to practice. It will keep your shoulders and arm engaged during non-practice days, and at the same time help you get more comfortable with the motion of the swing.
4. Use a Continental Grip
You want to make sure you use the right grip on the serve as it will affect the placement of the racket head at the point of contact. If your racket is at too much of an angle it will be difficult to generate power.
The continental grip is a good starting grip for the serve since it allows for some topspin motion without being too extreme a position. This should allow beginning players the positioning to make good contact with the ball while clearing the net.
Hold the racket in front of you and turn your hand slightly left towards the first bevel to position the hand in a continental grip. You can view the article on how to grip a tennis racket for additional information on grip types.
While the continental grip is ideal for most serves, some players like to experiment with other grips. A kick serve, for example, is best performed using the eastern backhand grip. Some players use a grip that is halfway between an eastern grip and a continental grip.
By and large, most players use the continental grip on serves. It is the most effective and natural grip on the serve. Beginners will see the best results by sticking to the continental grip when serving.
If you are an absolute beginner and finding the continental grip difficult to get used to, you can try using an eastern forehand grip. Once you get more comfortable with the stroke, however, you should aim to shift to the continental grip.
Here’s a great video from Venus Williams that covers the grip, toss, and other basics of the serve:
5. Simplify the Motion
When first starting out with the serve, you want to reduce the motion down to its most basic components. One simple way to do this is to just drop the racket head behind your back rather doing a full wind-up.
While you may not be able to generate as much power as the full wind-up, this will help you maintain better form. Once you are comfortable with the motion, you can then chose to transition to the full wind-up that will be discussed later.
Keep your arm and hand relaxed as you hold the racket behind you. Your elbow should be higher than your shoulder during this setup.
Focus on fully extending the tossing arm up towards the air, this will create a naturally balanced position with your knees bent. The tossing arm should go up first and your tossing shoulder should be higher than the hitting shoulder at this point.
When the ball is near its peak, take a swing at the ball. The point of contact should be vertically aligned with your shoulder. If the toss veers off too far to either side or too far in front or behind you it will impact your serve.
As you swing, you should be looking up. You need to be focused on the ball all the way through contact. This will improve your chances of making good contact with the ball.
6. The Service Stance
When positioning yourself for the serve, stand sideways with your feet about shoulder-width apart. This will set you up in a platform stance. Your shoulder and hip on your non-hitting side will be facing the net.
Point your front toe somewhere between the corner of the court and the corner post on your dominant side. A right-handed player would point their toe to the right corner or post. Your back foot will be more parallel to the net.
If you prefer to use a pinpoint stance (see next section) rather than a platform stance on your serves, you can start out with your feet roughly shoulder-width apart, and then as you toss the ball in the air, you can bring your feet together in a pinpoint stance.
During matches, you want to make sure you are standing behind the baseline. You are not allowed to step on the line until after you have made contact with the ball. Stepping on the line results in a “foot fault”, which is equivalent to missing the serve.
An added advantage of the platform stance is that your feet do not move during the serve. This will greatly reduce the likelihood that you will accidentally step on or over the line as long as you set up an inch or so behind the baseline.
7. Pinpoint and Platform Stances
There are two types of stances used when serving, the pinpoint stance and the platform stance. The platform stance, with feet separated at about shoulder width, allows the server to push off the legs during the serve.
In a pinpoint stance, the server’s feet are positioned close together. Some players begin in a similar position to the platform stance, however as they toss the ball in the air the back foot moves forward so that it is inches from the front foot.
The pinpoint stance involves more body movement and requires greater balance and coordination. Generally speaking, beginning players are better off using the platform stance for this reason.
However, it may come down to what feels more natural to you. While the pinpoint stance requires greater coordination, some players find the motion comes naturally to them. Experiment with both and see which one you prefer.
8. The Racket Swing Motion
When serving using the continental grip, the racket head will be perpendicular to your body when holding it behind your back and as you swing up to strike the ball.
In order to strike the ball properly, you need to rotate your arm outward (pronate) as you reach the top of the swing. This will ensure that the racket head is facing the ball on contact.
After you make contact use a downward snapping motion with your arm and wrist. This will create added power and topspin on the shot. Be sure to follow through on the swing.
Slice spin can be achieved by pronating less so that the strings strike the ball at an angle. Alternatively, you can use a more sideways trajectory on the swing as opposed to swinging forward.
A kick serve can be achieved by pronating outward more. The ideal grip for the kick serve is the eastern backhand grip, rather than the continental grip. This is the only serve performed with a different grip.
This type of serve takes a lot of practice and is pretty advanced, so be sure to master the basic serve before experimenting with this.
9. Turn Your Body as You Swing
While the motion of the arm is critical in the execution of a serve, equally important is the motion of your body. When you begin the serve, your shoulders will be roughly perpendicular to the net.
As you swing towards the ball, you need to rotate your body in the process, from a sideways stance to a forward-facing stance. Both of your shoulders should rotate simultaneously along with your chest.
Depending on whether you are hitting a flat serve or a spin serve, the timing on the rotation will vary. For a flat serve, turn your body just before you make contact. For a spin serve, delay the rotation until after you’ve made contact.
Regardless of whether you hit a flat or slice serve, when you finish the swing, your body should end up parallel to the net. At this point, your feet should also be pointing towards the net. This will help make the landing more natural and fluid.
10. Landing and Recovery
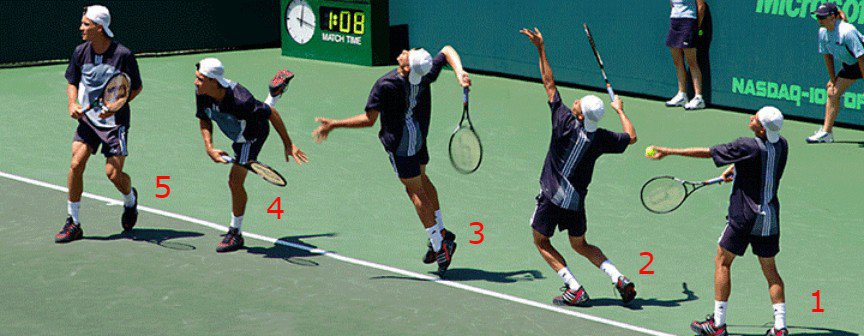
As you follow through on the swing after contact, you will land on your front foot (see image step 4). Due to the forward momentum of the swing, your back foot will naturally follow through as you step into your serve (see image step 5).
At this point, you have the option of using that forward momentum to approach the net more quickly. Alternatively, if you choose to remain on the baseline, you can recover by pushing off the foot and moving back to the ready position in preparation for your next shot.
Often times you will need to take an additional step forward due to momentum. The key is to allow your body to recover naturally from the forward thrust. If that means additional steps, that’s perfectly fine.
11. The Wind-Up: Putting it all Together
So far we’ve covered the simplified service technique which starts with the racket held behind your back. The full wind-up technique involves only two additional steps to execute.
The starting position for the full wind-up is with the racket held low, supported with the non-hitting hand, tennis ball in hand (see image step 1). As you extend your tossing arm up, raise the racket head up behind your head (see image step 2).
Your tossing shoulder should be higher than the hitting shoulder at this point. When initiating the service swing, your racket will drop behind your back (see image step 3) and then burst forward to strike the ball.
The motion when doing this should be fluid. You should not stop when dropping the racket back, it should be one continuous motion. Once you initiate the motion to strike the ball, the movement of the arm should be quick and smooth. Be sure to follow through fully to complete your swing.
Here is another great video that walks you through the beginner serve technique:
Ball Rotation and Types of Serves
Now that we’ve outlined the techniques involved in the serve, let’s take a look at ball rotation as it plays an important role in the serve. Spin is created by the angle at which the racket strikes the ball and the degree of ball rotation.
There are essentially four types of spin used during the serve. The first is the flat serve, second is the topspin serve, the third is the slice serve, and, finally, the fourth type of spin is the kick serve.
Let’s take a look at each of these serve types in more detail. As a beginner, you don’t need to put all of these to use right away. The flat serve is probably fine as a starting point. You can then progress onto the topspin and slice serves.
Flat Serve
The term flat serve is somewhat of a misnomer since all serves involve some degree of ball rotation. The flat serve, however, has the least amount of spin of all the serves. What it lacks in spin, however, it makes up for in power.
The flat serve is the most powerful of all serve types. But, because it involves little spin it typically has to be placed low to the net, leaving little margin for error.
With the flat serve, the racket contacts the backside of the ball. Following contact, the motion continues forward and slightly to the right. The face of the racket makes contact with the ball straight on.
Beginners who don’t yet have very much power on their serve can strike the ball straight through. However, usually players will strike the ball with some left to right motion, creating a minimal amount of spin on the ball.
Topspin Serve
Similar to topspin on groundstrokes, topspin is used on serves to create a high bounce on the ball once it lands in the service box. Topspin also allows you to aim higher above the net since the topspin effect will cause the ball to drop quickly.
You can also swing harder, knowing the ball will drop after crossing the net. In a topspin serve, the racket strikes the back of the ball at about a 45-degree angle, or somewhere between the horizontal and vertical axis of the ball (between 1 o’clock and 2 o’clock).
It’s important to note that the swing starts from low to high. You will not be able to strike the ball high to low and get it to clear the net. The topspin serve also involves some left to right motion to create the ball rotation.
Unlike the flat serve where the chest is parallel to the net at the point of contact, on the topspin serve you need to delay the rotation until after you’ve made contact. In other words, when striking the ball, your body will still be turned to the side.
Slice Serve
The slice serve in tennis is the equivalent to the curveball in baseball. It can be a very effective serve to throw off your opponent. The slice is more commonly used on second serves than on first serves, however, that does not have to be the case.
A proper slice serve is produced by brushing the center of the backside of the ball from left to right (for right-handed players). For left-handed players the motion is in reverse (i.e., right to left).
The ball toss on a slice serve should be to the side and in front. Lead with the racket edge (racket slightly angled) in order to generate spin. The swing motion should be more sideways and less forward relative to a flat serve.
Slice serves have a lower trajectory than topspin serves. For this reason, the ball tends to also bounce lower. However, due of the spin effect, it will land and divert to the side making it difficult to return.
A well-hit slice serve will curve and move further away from the returner towards one side or another. This makes it challenging for an opponent to return, and even if they do, they will end up further out of position.
Kick Serve
The kick serve is produced using a severe upward lift on the ball which. The motion is from the bottom left side of the ball to the top right side of the ball (for right-handed players). The service hand usually pronates during the motion to create the desired effect.
Unlike other serves, the kick serve is best performed using an eastern backhand grip. This is the only serve that does not use the continental grip. Some players prefer a grip halfway between the continental and eastern backhand grip.
Additionally, while most types of serves are performed with the ball slightly to the side and in front, the kick serve is executed at least above the head, or even further back behind the head to create the full spin effect.
When the ball bounces on a kick serve, it will tend to bounce aggressively with an upward kick. While the effect on the ball can make returning the ball difficult, the kick serve can be very hard on your shoulders and arm. It is not a very natural motion.
For this reason, this is a type of serve that beginners will want to stay away from, at least for a while. You don’t need it in your arsenal as long as you master the first three types of serves.
Ball Placement
Up to this point we’ve talked about technique and the types of serves used tennis. The final aspect of the serve is placement. As a general rule, you want to place your serves deep in the service box. This will keep your opponent further back.
In addition to depth, you have essentially three locations where you want to place your serve. The first is wide so that it comes within a foot or so of the far corner (furthest away from where your serving).
The second is down the line. Here you will be placing the ball about a foot from the inside corner of the service box. Down the line results in a faster hit serve and return, assuming your opponent is able to get to the ball.
Finally, the third placement area is down the center of the box, or straight to your opponent’s body. If you can jam your opponent on the backhand side, that’s even more effective.
Final Notes
If you are just getting started, go through each of the steps in order and when you are at a point where you can serve consistently, then start experimenting with the various types of spin and placement strategies.
Don’t worry so much about the result of your serve when first learning the technique. Rather, focus on the process of hitting a good serve. Keep your chin up and eye on the ball when serving. Try to be calm and let everything glide.
The tennis serve takes time to master. Don’t be frustrated if you are having difficulty with the execution. With regular practice, over time the motion will feel more automatic and you will not have to think of the steps involved.
Share this Post